
Start with an SD card with the raw scans on it. Be careful with the card. Only eject it properly and do not format it.
So, let’s open the program.

Start a NEW Project.

This gets saved on the local drive.

We are good to go.

Now let’s find those scans on the SD Card.

Copy the raw scans into the RawScans folder in the project.

Drop all the scans into the project.

Save it - the first save takes a minute as it unpacks the raw scans.

You can add comments because THERE IS NO UNDO… you can only revert back to a previous save.

Small project? Load All Scans.

Bigger project? Only load up to 12…

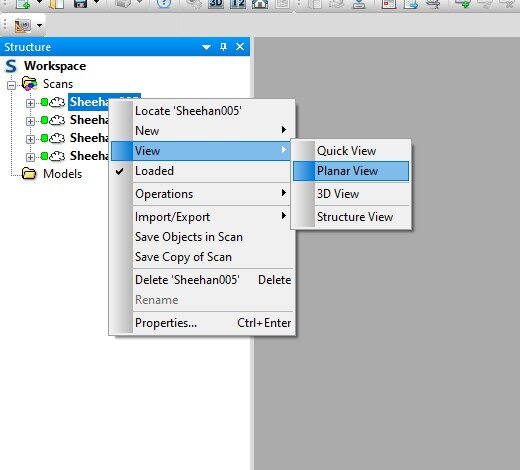
Start with the first and open the PLANAR VIEW.
Find the Targets. Use the yellow selectors to select them.

You can only see part of the sphere, so only select part of the sphere. Create object -> sphere radius for the normal spheres.

Make sure it is good - Green across the boards. Yellow is OK (but try again) . Red is Right Out!

Name these uniquely - Scan 1, name the targets 011, 012, 013, 014, 015, 016… Scan 2, name the targets 021, 022, 023, 024, 025, 026… Rename if you must.

When it is wide open, you can use the Sphere Selector.


Get the right name and no reason to rename.

Once you get all the spheres, SAVE.

Registration is interesting. Hopefully it works AOK without adjustment. Usually the little projects work fine.

Options…

Clustering is funny - see the next session for more information.

This one worked right away.

And there are other options to review. Huh, I wonder what the correspondence split view does.


You do want to check things out.

Each scan is in a different color. Make sure things line up.

Happy? Save it.

Colorize.

And SAVE

See it in Color.

You can delete outliers - be sure to SAVE afterwards…


Export away. Objects are the easiest - DXF, little file.

Create an EXPORT folder in your project.

Export the Images (panoramics and raw images)

Right into the folder… might have to go up a level.

Export the Scan Points.

As a PTS file… these are ugly files.

Be sure to export in COLOR and GREY.

Find POINTZIP and run it.

xyz for the points
i for the intensity
RGB for Red Green Blue
mm is fine for most applications
LAZ is better than LAS

Find the file and run it.

It is never responsive. Just let it do it’s thing.

And it ends.

Rename the EXPORT file to the project name with a date.

And copy it over to the LIDAR-STATIC folder.

Don’t make an extra copy by mistake.
